
If you’re a fan of frozen yogurt but don’t enjoy paying the steep prices at trendy shops, you’ll love this homemade alternative. With the KitchenAid ice cream maker attachment, you can easily create delicious frozen yogurt in your own kitchen at a fraction of the cost.
This recipe combines creamy vanilla yogurt with tangy black cherry Greek-style yogurt for a refreshing, slightly tart treat. The best part? You can control the sweetness, add seasonal fruits, and even toss in crunchy nuts for a personal touch, like the kitchenAid Chocolate Ice Cream.
By preparing this at home, you get healthier frozen yogurt with real flavors-no mystery ingredients, no preservatives-just pure, creamy goodness straight from your KitchenAid.
What Is KitchenAid Frozen Yogurt and What Does It Taste Like?
Frozen yogurt is a cool and creamy dessert that sits perfectly between ice cream and traditional yogurt. It offers the indulgence of a frozen treat but with a lighter texture and tangier flavor.

This version, made with a mix of vanilla and black cherry yogurt, has a smooth, thick consistency. The cherry adds a fruity punch, while the vanilla balances it with subtle sweetness. Using stevia instead of sugar makes it guilt-free without sacrificing flavor.
Once churned in the KitchenAid bowl, you’ll notice how it develops that signature frozen yogurt texture-soft, airy, and scoopable. Add walnuts or fresh blueberries on top, and you’ll have a frozen dessert that tastes both refreshing and satisfying.
Ingredients Required for KitchenAid Frozen Yogurt Recipe
- Gather all the following ingredients, before you start making this KitchenAid Frozen Yogurt
- 650g container of Activia Vanilla Yogurt (full fat recommended)
- 1 container of Liberté Mediterranean Black Cherry Greek-style Yogurt
- Stevia (adjust to taste; a small packet equals about 2 tsp of sugar)
- 1 tablespoon vanilla extract
- Optional add-ins: walnuts, cherries, blueberries, or seasonal fruit
Kitchen Utensils Required
- KitchenAid stand mixer with ice cream maker attachment
- Mixing spoon or spatula
- Measuring spoons
- Airtight containers for storage
Preparation & Cooking Time
Prep Time: 10 minutes
Churning Time: 30 minutes
Freezing Time: 1–2 hours (optional for firmer texture)
Yield: About 6–8 servings
Copycat KitchenAid Frozen Yogurt Recipe
Just follow this simple step by step guideline to make your homemade version of KitchenAid Frozen Yogurt in a delicious way.
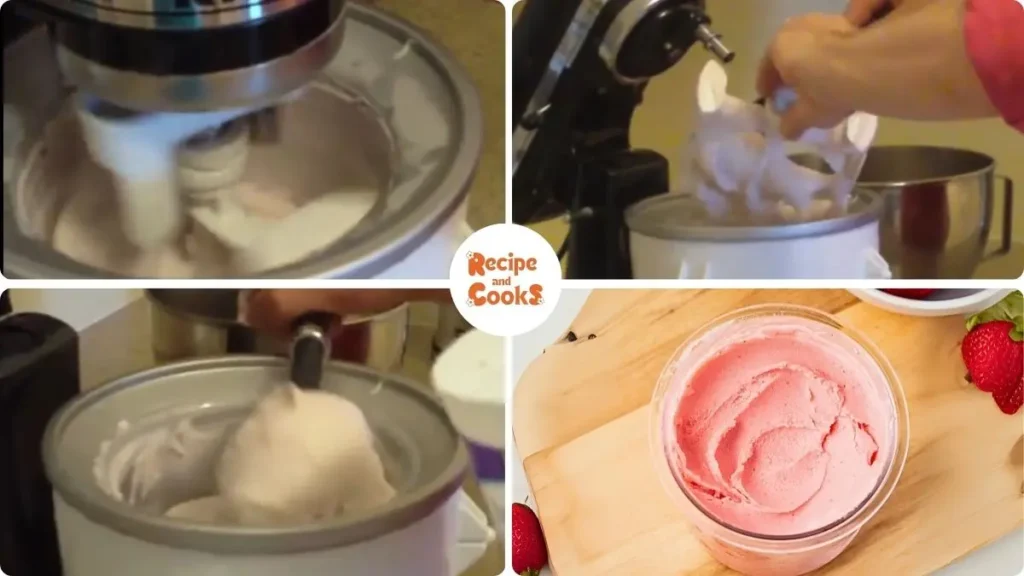
1. Freeze the bowl: Place your KitchenAid ice cream bowl in the freezer for at least 24 hours before use.

2. Prepare the mixture: In a large mixing bowl, combine the vanilla yogurt, cherry yogurt, stevia, and vanilla extract. Stir until smooth.
3. Set up the KitchenAid: Attach the frozen bowl and dasher to your stand mixer. Pour the yogurt mixture into the bowl.
4. Churn the yogurt: Set the mixer to speed 1 and let it churn for about 25–30 minutes until the mixture thickens and reaches a soft-serve consistency.
5. Add toppings (optional): In the last few minutes, gently fold in chopped walnuts, cherries, or blueberries.
6. Serve or freeze: Enjoy immediately for soft-serve frozen yogurt, or transfer to airtight containers and freeze for 1–2 hours for a firmer scoop.
Delicious Ways to Customize and Serve This KitchenAid Frozen Yogurt
Here are some Variations and Customizations ideas you can try to enjoy this KitchenAid Frozen Yogurt deliciously
1. Fresh Berry Topping
One of our favorite ways to enjoy this frozen yogurt is by topping it with fresh seasonal berries-blueberries, strawberries, or raspberries. The tartness of the fruit balances perfectly with the creamy sweetness of the yogurt.
2. Drizzle of Honey
Sometimes, we keep it simple with just a light drizzle of honey. It adds a natural sweetness and a glossy finish that makes the yogurt taste even more indulgent without being heavy.
3. Crunchy Granola
For breakfast-style frozen yogurt, we like adding a handful of crunchy granola on top. It turns the treat into a parfait-like experience that’s both filling and satisfying.
4. Chocolate Shavings
When we’re craving something a little richer, we shave some dark chocolate over the top. The bitterness of the chocolate cuts through the tangy yogurt, giving it that classic sweet-and-slightly-bitter contrast.
5. Nutty Mix-ins
We’ve found that walnuts or almonds add just the right crunch. The creamy-cherry flavor paired with nuts feels like an elevated dessert you’d expect at a restaurant.
6. Tropical Twist
Sometimes we add diced mango, pineapple, or coconut flakes. The tropical flavors instantly remind us of summer vacations, and it makes the frozen yogurt taste refreshing and exotic.
7. Swirl of Jam
A spoonful of cherry or strawberry jam swirled through the yogurt makes for a quick flavor boost. We’ve even tried blueberry preserves, and it turned out wonderfully rich and fruity.
8. Frozen Yogurt Sundae
When we really want to treat ourselves, we build it like a sundae-with whipped cream, crushed nuts, and a cherry on top. It feels like ice cream but lighter and less guilt-inducing.

9. With Warm Brownies
Pairing this frozen yogurt with warm brownies is a match made in heaven. The contrast of hot and cold, fudgy and creamy, makes every bite irresistible. We’ve served this combo to friends, and it’s always a hit.
My Personal Experience and Some Tips on This KitchenAid Frozen Yogurt Recipe
I loved making this KitchenAid frozen yogurt recipe at home. It was fun to see the yogurt turn creamy right in the mixer. I liked using cherry and vanilla together because it made a sweet and fruity taste. I also added some blueberries, and they made it even better.
The best part was sharing it with my family. They said it tasted just like the frozen yogurt shop, but fresher and cheaper.
1. Put the KitchenAid bowl in the freezer for a whole day before using.
2. Use full-fat yogurt to make it creamy and thick.
3. Add stevia slowly so it does not get too sweet.
4. Try different fruit flavors like strawberry or peach.
5. Mix in nuts or fruit at the very end for a nice crunch.
6. Eat it right away if you like soft-serve.
7. Freeze it longer if you like scoops like ice cream.
How to Store Leftover KitchenAid Frozen Yogurt Properly?
If you have any leftover (hopefully you don’t have) you can process them properly as follows,
Store leftover frozen yogurt in airtight containers in the freezer for up to 2 weeks. For the best texture, let it sit at room temperature for 5–10 minutes before scooping.
KitchenAid Frozen Yogurt Recipe
Ingredients
- Gather all the following ingredients before you start making this KitchenAid Frozen Yogurt
- 650 g container of Activia Vanilla Yogurt full fat recommended
- 1 container of Liberté Mediterranean Black Cherry Greek-style Yogurt
- Stevia adjust to taste; a small packet equals about 2 tsp of sugar
- 1 tablespoon vanilla extract
- Optional add-ins: walnuts cherries, blueberries, or seasonal fruit
Instructions
- Place your KitchenAid ice cream bowl in the freezer for at least 24 hours before use.
- In a large mixing bowl, combine the vanilla yogurt, cherry yogurt, stevia, and vanilla extract. Stir until smooth.
- Attach the frozen bowl and dasher to your stand mixer. Pour the yogurt mixture into the bowl.
- Set the mixer to speed 1 and let it churn for about 25–30 minutes until the mixture thickens and reaches a soft-serve consistency.
- In the last few minutes, gently fold in chopped walnuts, cherries, or blueberries.
- Enjoy immediately for soft-serve frozen yogurt, or transfer to airtight containers and freeze for 1–2 hours for a firmer scoop.
Video
Notes
FAQs on this KitchenAid Frozen Yogurt Recipe
When you give this KitchenAid Frozen Yogurt Recipe a try, you might have a few questions. Don’t worry-we’ve rounded up answers to the most common ones to help you out.
1. How to make frozen yogurt with KitchenAid?
From our experience, it’s really simple! Just freeze your KitchenAid ice cream bowl for 24 hours, mix your yogurt base (we love using vanilla and black cherry yogurt), and churn it in the mixer on the lowest speed for about 30 minutes. It turns into a soft-serve style frozen yogurt that’s ready to enjoy.
2. Is frozen yogurt actually healthy?
Yes, it can be! Frozen yogurt is lighter than ice cream, especially when made at home. We like to use full-fat yogurt for creaminess but sweeten it with stevia instead of sugar to cut calories. Plus, you can add fresh fruits or nuts for extra nutrition.
3. Can I use my KitchenAid to make ice cream?
Absolutely. The KitchenAid ice cream attachment works for both ice cream and frozen yogurt. We’ve tried both, and the only difference is your base ingredients. With cream and sugar, you’ll get ice cream; with yogurt, you’ll get frozen yogurt.
4. Do I need to use full-fat yogurt?
We’ve found that full-fat yogurt gives the best texture-thick, creamy, and rich. Low-fat or fat-free versions tend to make the frozen yogurt icier and less smooth. If you want that shop-style creaminess, full-fat is worth it.
5. How long does it take to make frozen yogurt in KitchenAid?
The actual churning takes about 25–30 minutes. If you like soft-serve style, you can eat it right away. But if you prefer it firmer, we recommend freezing it for another 1–2 hours before scooping.
6. What sweeteners work best for frozen yogurt?
We personally like using stevia because it keeps the recipe light and still tastes great. But you can use honey, maple syrup, or even regular sugar if you prefer. Just adjust to your taste.
7. Can I add fruits or nuts to the frozen yogurt?
Yes! We often fold in chopped walnuts, fresh blueberries, or even extra cherries during the last 5 minutes of churning. It gives the yogurt more texture and flavor.
8. How do I store homemade frozen yogurt?
We keep ours in airtight containers in the freezer. It lasts about two weeks, but honestly, it’s usually gone before then. Just let it sit on the counter for 5–10 minutes before scooping-it softens up nicely.
9. Can I make different flavors with this method?
Definitely! We’ve tried plain vanilla, strawberry, and even mango. Just swap the yogurt flavors or blend in fresh fruit before churning. The KitchenAid does a great job handling different bases.
10. Why make frozen yogurt at home instead of buying it?
For us, it’s all about cost, customization, and quality. Yogurt shops can be pricey, and you don’t always know what’s in their mixes. At home, you get more for less money, plus the freedom to use healthier ingredients and experiment with flavors.
This KitchenAid frozen yogurt recipe proves that making a creamy, refreshing dessert at home can be simple, customizable, and cost-effective. With just a few ingredients and your KitchenAid mixer, you can create endless flavor combinations and skip the expensive yogurt shops.
If you enjoyed this recipe, give it a try and share it with family or friends. Don’t forget to leave a comment with your favorite mix-ins-we’d love to hear how you make this frozen yogurt your own!
We’d love to hear how this recipe turns out for you! Give it a try, then drop a comment below to share your thoughts and tips with us.
You can also follow us on Pinterest, and YouTube for more delicious updates and kitchen inspiration. Your feedback and support mean the world to us!
so yummy
All good except you are suppose to mix ingredients first in a separate bowl then pour into mixer as its going! Chance that attachment might break ! Never restart mixer mixer after it stops in the mixture!